Introduction to VR Development
introduction to VR controls and how to develop for VR.
Understanding Basic VR Controls

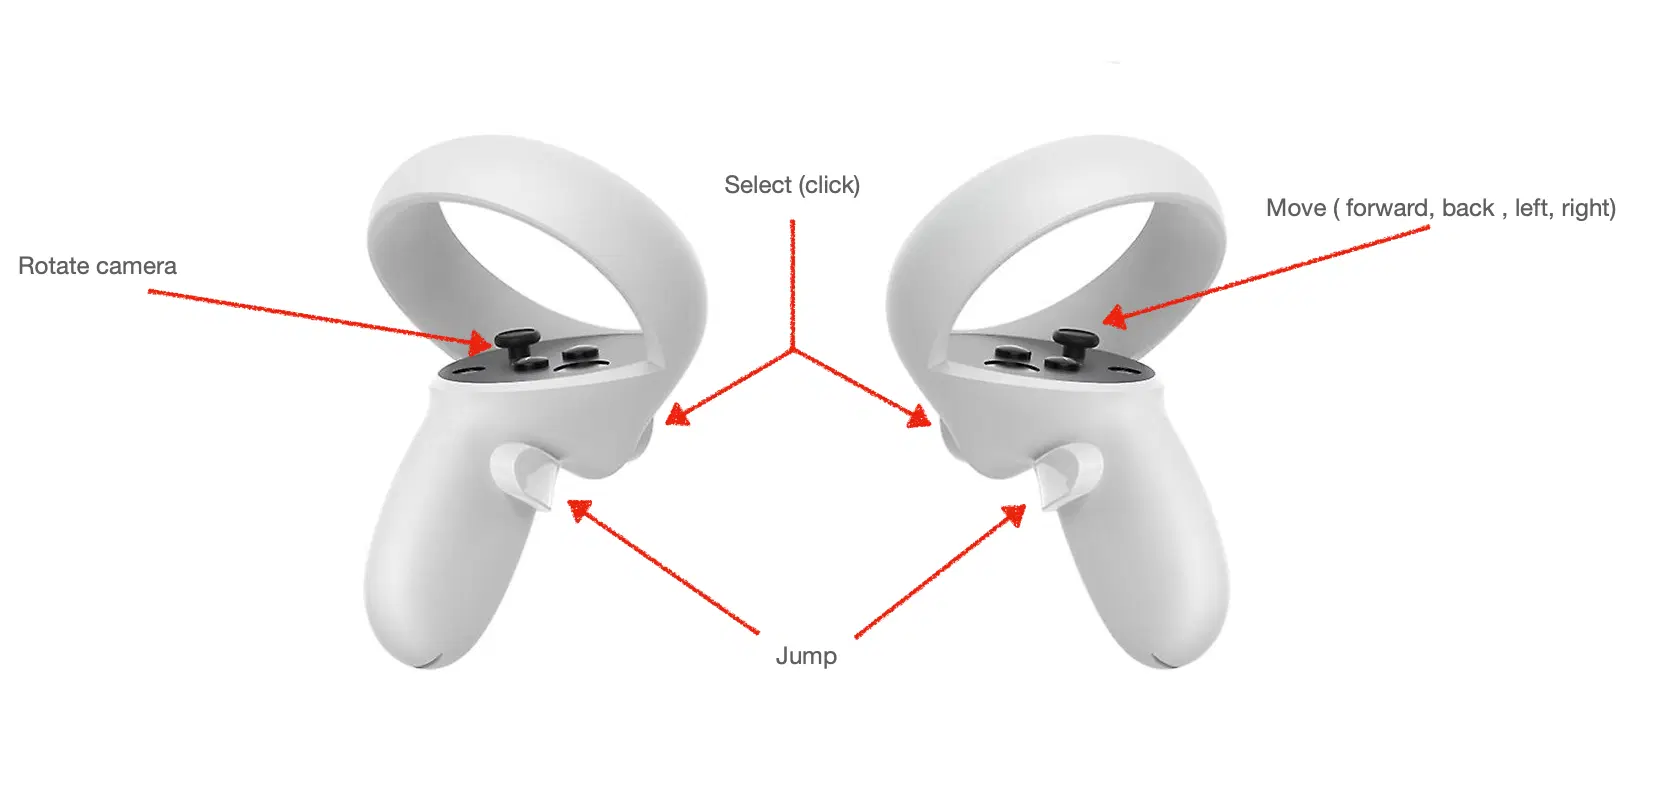
In Redbrick Studio, the basic VR controls are set up as shown in the image above.
- Left Joystick: Used to rotate the view left and right.
- Right Joystick: Used to move forward, backward, and sideways.
- Front Trigger Button: Used to select objects.
- Side Trigger Button: Used to jump.
NOTE: Currently, the GUI is not rendered in VR, so please keep this in mind.
Although the GUI is not rendered, you can use 3D sprite objects to simulate the GUI in VR.
Basic VR Options
You can toggle the “VR option” while creating a template in order to use it. This will automatically add additional code to PresetScript, so you don’t have to manually do so.
const avatar = REDBRICK.AvatarManager.createDefaultAvatar();
const camera = WORLD.getObject("MainCamera");
const followingCamera = avatar.setFollowingCamera(camera);
avatar.setDefaultController();
followingCamera.useVR({ VRObject: avatar }); //VR needs to have VRObjectNOTE: VR functionality is compatible exclusively with perspective
cameras.
Additionally, VR can be used with other VRObjects too.
const headOfSomething = WORLD.getObject("headOfSomething");
const camera = WORLD.getObject("cameraTitle");
camera.useVR({ VRObject: headOfSomething }); // now you can use VR without an avatar
If you choose a game mode and VR settings, the PresetScript might look like this. However, you can customize it as in the previous example (headOfSomething).
const camera = WORLD.getObject("MainCamera");
if (!camera) return;
const obj = new THREE.Object3D();
WORLD.add(obj);
obj.position.copy(camera.position);
camera.useVR({ VRObject: obj });
How to Test VR

This section explains using the Meta Quest 3.
After turning on the VR device, open the browser and go to the publishing link of the project uploaded on Redbrick.
Click Run, then press the Enter VR button at the bottom to start the VR test.

To exit the VR test, press the Oculus button to open the browser
window.
Then, use the front trigger button to click the Exit button to leave the
VR session.
Testing without VR devices
If you want to create and experience VR content but don’t have a VR headset, you can use a VR Chrome extension.
These extensions are only for Chrome. If you are using another browser, please search for an extension that works for you.
Recommend installing the Web Emulator, and after installation, you can test it as a virtual VR device by pressing fn + F12 to open Developer Tools and selecting the WebXR tab, as shown in the video below.

Creating Interactions with Objects
In Redbrick Studio, you can create interactions with objects using the front trigger button.
The function that can handle the front trigger button is the OnClick function.
// VR Option Setting
const avatar = REDBRICK.AvatarManager.createDefaultAvatar();
const camera = WORLD.getObject("MainCamera");
const followingCamera = avatar.setFollowingCamera(camera);
avatar.setDefaultController();
followingCamera.useVR({ VRObject: avatar });

// Setting interaction
const box = WORLD.getObject("BOX");

function Start() {
  box.onClick(() => {
    box.kill();
  });
}
The code above places a box in the world, and when the trigger button is clicked, the box disappears.
You can test this interaction in VR, and it will behave as shown below.

When using Redbrick assets, be aware that the actual object might be placed in
a child object(2nd) rather than the parent object(1st).
If the OnClick function is attached to the parent object(1st), it might not
register clicks correctly.
Therefore, you should ensure that the OnClick function is attached to the
child object(2nd) in the script.
When using external assets, you also need to connect the OnClick function
to the object the asset is contained within.

Here are the available VR event functions in Redbrick Studio:
| Text | Redbrick Studio |
|---|---|
| Move | ✅ |
| Jump | ✅ |
| Trigger(click) | ✅ |
| Grap | ❌ |
| GUI | ❌ |
Although the GUI is not rendered, you can use 3D sprite objects to simulate the GUI in VR.